This document will explain how to use Open Source Software Switch, called as Open vSwitch for providing network connection between Virtual Machine inside the VirtualBox virtualization platform.

x

Component Used

1. Ubuntu Linux 12.04 LTS (Precise Pangolin)

2. VirtualBox Software 4.2 (downloaded from Ubuntu Repository Server)

3. Open vSwitch Software Switch 1.4 (Installed from Ubuntu Repository Server)

x

Installation VirtualBox

VirtualBox can be installed very easy using aptitude tool from Ubuntu Repository Server.

aris@djogja:/opt$ sudo apt-get update
aris@djogja:/opt$ sudo apt-get install dkms
aris@djogja:/opt$ sudo apt-get install virtualbox-4.2
 

If there is any error because of signatures error from VirtualBox website

W: GPG error: http://download.virtualbox.org precise InRelease: The following signatures couldn’t be verified because the public key is not available: NO_PUBKEY 54422A4B98AB5139
 

So, the key need to be install manually using this command below.

aris@djogja:/opt$ wget -q http://download.virtualbox.org/virtualbox/debian/oracle_vbox.asc -O- | sudo apt-key add –
 

After key installation success, please repeat DKMS and VirtualBox installing command

x

Installation of Open vSwitch

Open vSwitch also can be installed very easily through Ubuntu Repository Server using aptitude tools. There are some mandatory packages need to be install but there are some additional fitur which can be installed to utilize the Open vSwitch. The mandatory package such as Open vSwitch datapath can be installed using this following command.

aris@djogja:/opt$ sudo apt-get install openvswitch-datapath-source bridge-utils
aris@djogja:/opt$ sudo module-assistant auto-install openvswitch-datapath
 

In order to enhance the functionality of the Open vSwitch some additional packages can be installed such as “openvswitch-brcompat” for linux bridge compatibility configuration and “openvswitch-controller” for adding controller function in the same hosts.

aris@djogja:/opt$ sudo apt-get install openvswitch-brcompat openvswitch-common openvswitch-controller
 

After the installation finish, the controller will be automatically run using default TCP port number and certificate.

x

Open vSwitch (Bridge) Configuration

The first step to configure the switch is preparing the datapath or bridge for virtual interfaces from the virtual machines. These following commands will create datapath or bridge called as “br1” and virtual interface called as “vnet0”.

aris@djogja:/opt$ sudo ovs-vsctl add-br br1
aris@djogja:/opt$ sudo ip tuntap add mode tap vnet0
aris@djogja:/opt$ sudo ip link set vnet0 up
aris@djogja:/opt$ sudo ovs-vsctl add-port br0 vnet0
aris@djogja:/opt$ sudo ifconfig br1 up
 

Make sure the datapath or bridge and interfaces are up using these following commands.

aris@djogja:/opt$ sudo ip link
1: lo: <LOOPBACK,UP,LOWER_UP> mtu 16436 qdisc noqueue state UNKNOWN
link/loopback 00:00:00:00:00:00 brd 00:00:00:00:00:00
2: eth0: <NO-CARRIER,BROADCAST,MULTICAST,UP> mtu 1500 qdisc pfifo_fast state DOWN qlen 1000
link/ether 00:26:6c:85:d6:e1 brd ff:ff:ff:ff:ff:ff
3: wlan0: <BROADCAST,MULTICAST,UP,LOWER_UP> mtu 1500 qdisc mq state UP qlen 1000
link/ether e8:39:df:c5:ae:e0 brd ff:ff:ff:ff:ff:ff
….
15: br1: <BROADCAST,MULTICAST,UP,LOWER_UP> mtu 1500 qdisc noqueue state UNKNOWN
link/ether 92:91:cd:57:bc:4f brd ff:ff:ff:ff:ff:ff
16: vnet0: <NO-CARRIER,BROADCAST,MULTICAST,UP> mtu 1500 qdisc pfifo_fast state DOWN qlen 500
link/ether 76:94:b8:8e:e1:da brd ff:ff:ff:ff:ff:ff
 
aris@djogja:/opt$ ifconfig
br1 Link encap:Ethernet HWaddr 92:91:cd:57:bc:4f
inet6 addr: fe80::9091:cdff:fe57:bc4f/64 Scope:Link
UP BROADCAST RUNNING MULTICAST MTU:1500 Metric:1
RX packets:0 errors:0 dropped:0 overruns:0 frame:0
TX packets:21 errors:0 dropped:0 overruns:0 carrier:0
collisions:0 txqueuelen:0
RX bytes:0 (0.0 B) TX bytes:4694 (4.6 KB)
 
eth0 Link encap:Ethernet HWaddr 00:26:6c:85:d6:e1
UP BROADCAST MULTICAST MTU:1500 Metric:1
RX packets:0 errors:0 dropped:0 overruns:0 frame:0
TX packets:0 errors:0 dropped:0 overruns:0 carrier:0
collisions:0 txqueuelen:1000
RX bytes:0 (0.0 B) TX bytes:0 (0.0 B)
Interrupt:43
 
lo Link encap:Local Loopback
inet addr:127.0.0.1 Mask:255.0.0.0
inet6 addr: ::1/128 Scope:Host
UP LOOPBACK RUNNING MTU:16436 Metric:1
RX packets:407456 errors:0 dropped:0 overruns:0 frame:0
TX packets:407456 errors:0 dropped:0 overruns:0 carrier:0
collisions:0 txqueuelen:0
RX bytes:846803394 (846.8 MB) TX bytes:846803394 (846.8 MB)
 
vnet0 Link encap:Ethernet HWaddr 76:94:b8:8e:e1:da
UP BROADCAST MULTICAST MTU:1500 Metric:1
RX packets:0 errors:0 dropped:0 overruns:0 frame:0
TX packets:0 errors:0 dropped:0 overruns:0 carrier:0
collisions:0 txqueuelen:500
RX bytes:0 (0.0 B) TX bytes:0 (0.0 B)
 
wlan0 Link encap:Ethernet HWaddr e8:39:df:c5:ae:e0
inet addr:192.168.1.4 Bcast:192.168.1.255 Mask:255.255.255.0
inet6 addr: fe80::ea39:dfff:fec5:aee0/64 Scope:Link
UP BROADCAST RUNNING MULTICAST MTU:1500 Metric:1
RX packets:636440 errors:0 dropped:0 overruns:0 frame:0
TX packets:613058 errors:0 dropped:0 overruns:0 carrier:0
collisions:0 txqueuelen:1000
RX bytes:712913720 (712.9 MB) TX bytes:93192778 (93.1 MB)
 
aris@djogja:/opt$ sudo ovs-vsctl show
cdf41e3a-b0a8-4251-ae8c-bc0ab323bfba
Bridge “br1”
Port “br1”
Interface “br1”
type: internal
Port “vnet0”
Interface “vnet0”
Port “eth0”
Interface “eth0”
ovs_version: “1.4.0+build0”
 

In order to test connectivity between the virtual switch with the virtual machine, put IP address on the datapath or bridge interfaces (acting as management IP address)

aris@djogja:/opt$ sudo ifconfig br1 172.16.1.1 netmask 255.255.255.0 up

x

Virtual Machine Configuration

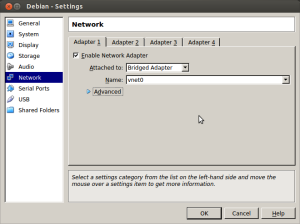
There is no special configuration for the virtualbox virtual machine, except selecting the proper interface for “Bridged Adapter” for Virtual Machine “Network Adapter”. For selecting the interface, use the virtual machine “Settings” and choose the “Network” in the left pane. Then give check mark on the “Enable Network Adapter”, select “Attached to : Bridged Adapter” and then select the name which already defined in the previous section “vnet0”.

OpenvSwicth-and-Vbox

Network Adapter Configuration on the VirtualBox

Click “OK” and the run the virtual machine. In order to test the connection give the IP address on the network interface of the virtual machine with the IP address from the same segment (172.16.1.0/24).

aris@djogja:/opt$ sudo ifconfig eth4 172.16.1.2 netmask 255.255.255.0 up

x

Connectivity Testing

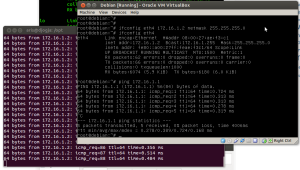
Testing can be done by sending ICMP packet (Pinging) from the Open vSwitch to the Virtual Machine or vice versa.

Ping Result between Virtual Switch and Virtual Machine

Ping Result between Virtual Switch and Virtual Machine

x

Reference

1.  Open vSwitch on Virtual Box 
This article will explain how to provide virtual desktop using remote display technology on Oracle VirtualBox. The server will gives every user their own desktop by assigning dedicated virtual machine for them. But for reducing the load on the server, the VirtualBox should be able to run every virtual machine without loading the GUI (Headless Mode).

x

Components used

1. Ubuntu Linux 12.04 (Precise Pangolin) for host OS and Ubuntu Linux 10.04 (Lucid) for guest OS.

2. Oracle VirtualBox 4.1 (including extension pack 4.1.14 from Oracle) 

x

VirtualBox Installation

There are two types components to be installed which are VirtualBox Base Packages and VirtualBox Extension Packs (VRDP, virtual USB, Intel PXE Boot, and PCI Passthrough). Base packages installation can be done using aptitude tools from the Ubuntu repository.

$ sudo apt-get update
$ sudo apt-get install dkms virtualbox
x

Sometimes we need to install manually DKMS module using this command.

$ sudo /etc/init.d/vboxdrv setup
x

If the installation still failed, please try to update kernel utilities (kernel header and kbuild) before run the command above.

$ sudo apt-get install linux-headers linux-kbuild
x

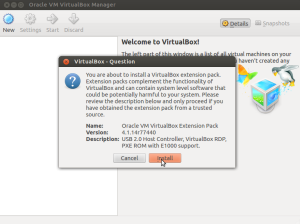
The next step is VirtualBox extension pack installation which already downloaded from Oracle websites. Install by executed the file or by double click the file until the VirtualBox installation window appear, and klik “Install”.

Vbox-install-exten-2

VirtualBox Extension Pack Installation Window

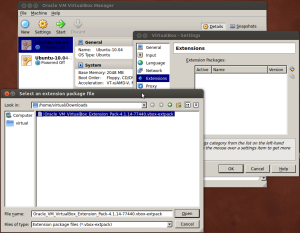
But, installation also can be done by selecting this following menu File > Preference > Extensions on the Main window of VirtualBox.

Virtual Box Extension Pack Installation from Main Menu

Virtual Box Extension Pack Installation from Main Menu

x

Configuring Virtual Desktop for Remote Display Support

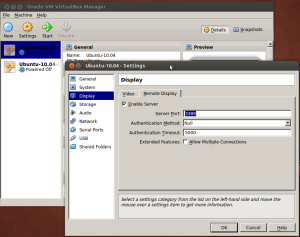
In order to support remote display, some configuration need to be changed on the specific virtual desktop (virtual machine). Select one of the virtual machine and then select “Settings” menu. There is menu “Displays” on the right window and then click “Remote Display”. Remote display “Enable Server” is disabled by default, and to active just give check mark on the box.

VirtualBox-enable-vrdp

Enabling VRDP Server on the Virtual Desktop (Virtual Machine)

This task also can be done using this below CLI (Command Line Interface)

$ sudo VBoxManage modifyvm Ubuntu-10.04 –vrde on

x

Running Virtual Desktop on Headless Mode

Sometimes the virtual desktop GUI no required to be ran in the server, because it is only required enable VRDP and the GUI will be accessed through the client terminal. VirtualBox can be run without GUI by running specific virtual desktop at VirtualBox Server on the Headless Mode.

$ sudo VBoxHeadless –startvm Ubuntu-10.04
[sudo] password for virtual:
Oracle VM VirtualBox Headless Interface 4.1.12_Ubuntu
(C) 2008-2012 Oracle Corporation
All rights reserved.

x

Accessing Virtual Desktop using RDP Client

Virtual Machine on the VirtualBox Server can be accessed using any RDP client software such as “rdesktop” which already included in the Ubuntu Linux distribution.

$ rdesktop 167.205.64.102:3389
Autoselected keyboard map en-us
x

If the connection is successful, the GUI from the virtual machine will appear.

Virtual Desktop GUI form one Virtual Machine in the Virtual Box Server

Virtual Desktop GUI form one Virtual Machine in the VirtualBox Server

Components used

1. Ubuntu Linux 12.04 (Precise Pangolin) 64-bit with kernel 3.2.0-24-generic version

2. LXC Ubuntu software 0.7.5-3 version

3. CGroup-lite 1.1 version for activating CGroup File Systems and Debootstrap 1.0.39 version for helping guest OS installation

x

LXC Software Installation

The easiest way to install the software is using Ubuntu repository through aptitude command.

$ sudo apt-get update
 
$ sudo apt-get install lxc lxctl
 
Reading package lists… Done
Building dependency tree
Reading state information… Done
The following extra packages will be installed:
cgroup-lite debootstrap libapparmor1 libipc-system-simple-perl
liblinux-lvm-perl libnet-ssh2-perl libossp-uuid-perl libossp-uuid16
libssh2-1 lvm2 perl-doc watershed
Suggested packages:
uuid btrfs-tools qemu-user-static groff
The following NEW packages will be installed:
cgroup-lite debootstrap libapparmor1 libipc-system-simple-perl
liblinux-lvm-perl libnet-ssh2-perl libossp-uuid-perl libossp-uuid16
libssh2-1 lvm2 lxc lxctl perl-doc watershed
0 upgraded, 14 newly installed, 0 to remove and 6 not upgraded.
Need to get 8,790 kB/9,032 kB of archives.
After this operation, 16.4 MB of additional disk space will be used.
Do you want to continue [Y/n]? y
Get:1 http://kambing.ui.ac.id/ubuntu/ precise/universe libipc-system-simple-perl all 1.21-1 [27.7 kB]
Get:2 http://kambing.ui.ac.id/ubuntu/ precise/universe liblinux-lvm-perl all 0.15.01-1 [12.4 kB]
. . . .
. . . .
cgroup-lite start/running
Setting up debootstrap (1.0.39) …
Processing triggers for libc-bin …
ldconfig deferred processing now taking place
Processing triggers for initramfs-tools …
update-initramfs: Generating /boot/initrd.img-3.2.0-24-generic

x

The installation can be verified using this command.

$ sudo lxc-checkconfig
 
Kernel config /proc/config.gz not found, looking in other places…
Found kernel config file /boot/config-3.2.0-24-generic
— Namespaces —
Namespaces: enabled
Utsname namespace: enabled
Ipc namespace: enabled
Pid namespace: enabled
User namespace: enabled
Network namespace: enabled
Multiple /dev/pts instances: enabled
— Control groups —
Cgroup: enabled
Cgroup clone_children flag: enabled
Cgroup device: enabled
Cgroup sched: enabled
Cgroup cpu account: enabled
Cgroup memory controller: enabled
Cgroup cpuset: enabled
 
— Misc —
Veth pair device: enabled
Macvlan: enabled
Vlan: enabled
File capabilities: enabled
Note : Before booting a new kernel, you can check its configuration
usage : CONFIG=/path/to/config /usr/bin/lxc-checkconfig
 

Creating and Running Virtual Machine

Before VM can be created, VM directory need to be provided (usually on /var/lib/lxc/<name_of_vm>).

$ sudo mkdir /var/lib/lxc/vm
 

Create VM using LXC script with specify the name of VM, tipe of linux distribution, machine architecture and release. It will required the internet connection to download packages for installing VM.

$ sudo lxc-create -n vm -t ubuntu –- -a i386 -r precise
 

After installation finished, change the password of the virtual machine.

$ sudo chroot /var/lib/lxc/vm/rootfs passwd root
Enter new UNIX password:
Retype new UNIX password:
passwd: password updated successfully
 

Virtual machine can be running using LXC command-line utility with specify name of VM and the file configuration.

$ sudo lxc-start -n vm -f /var/lib/lxc/vm/config -d
 

After the virtual machine start, it can be accessed through the LXC command-line utility with specify name of VM.

$ sudo lxc-console -n vm
 

LXC-running-b

x

Reference

1. LXC Ubuntu Official Documentation

Component Used

1. Intel Processor for PC with Intel VT-x support

2. Ubuntu Linux 12.04 (Precise Pangolin) 64-bit with 3.2.0-24-generic kernel for Host

3. QEMU/KVM 1.0 version and KVM module 1.84 version

x

Virtualization Support Verification

This verification ensures that PC/Host already support virtualization technology, especially for processor.

$ more /proc/cpuinfo | grep “vmx”
flags : fpu vme de pse tsc msr pae mce cx8 apic sep mtrr pge mca cmov pat pse36 clflush dts acpi mmx fxsr sse sse2 ss ht tm pbe syscall nx rdtscp lm constant_tsc arch_perfmon pebs bts rep_good nopl xtopology nonstop_tsc aperfmperf pni pclmulqdq dtes64 monitor ds_cpl vmx est tm2 ssse3 cx16 xtpr pdcm pcid sse4_1 sse4_2 popcnt tsc_deadline_timer xsave avx lahf_lm arat epb xsaveopt pln pts dts tpr_shadow vnmi flexpriority ept vpid
x
$ sudo kvm-ok
[sudo] password for virtual:
INFO: /dev/kvm exists
KVM acceleration can be used

x

QEMU/KVM Software Installation

The easiest way for installing the software is through the Ubuntu repository with aptitude tools.

$ sudo apt-get update
$ sudo apt-get install kvm qemu-kvm
Reading package lists… Done
Building dependency tree
Reading state information… Done
The following extra packages will be installed:
kvm-ipxe libaio1 librados2 librbd1 qemu-common qemu-utils seabios vgabios
Suggested packages:
mol-drivers-macosx openbios-sparc ubuntu-vm-builder uml-utilities
The following NEW packages will be installed:
kvm kvm-ipxe libaio1 librados2 librbd1 qemu-common qemu-kvm qemu-utils seabios vgabios
0 upgraded, 10 newly installed, 0 to remove and 60 not upgraded.
Need to get 0 B/5,296 kB of archives.
After this operation, 17.6 MB of additional disk space will be used.
Do you want to continue [Y/n]? y
Selecting previously unselected package libaio1.
(Reading database … 168635 files and directories currently installed.)
Unpacking libaio1 (from …/libaio1_0.3.109-2ubuntu1_amd64.deb) …
Selecting previously unselected package seabios.
Unpacking seabios (from …/seabios_0.6.2-0ubuntu2_all.deb) …
Setting up kvm (1:84+dfsg-0ubuntu16+1.0+noroms+0ubuntu13) …
Setting up kvm-ipxe (1.0.0+git-3.55f6c88-0ubuntu1) …
Processing triggers for libc-bin …
ldconfig deferred processing now taking place
 
$ sudo dpkg -l | grep kvm
ii kvm 1:84+dfsg-0ubuntu16+1.0+noroms+0ubuntu13 dummy transitional package from kvm to qemu-kvm
ii kvm-ipxe 1.0.0+git-3.55f6c88-0ubuntu1 PXE ROM’s for KVM
ii qemu-kvm 1.0+noroms-0ubuntu13 Full virtualization on i386 and amd64 hardware

x

Creating and Running Virtual Machine

The steps for creating virtual machine including preparing the space or virtual disk, installing guest OS, and running the virtual guest OS.

$ sudo mkdir /media/DATA/kvm
$ cd /media/DATA/kvm
$ sudo qemu-img create -f vdi vm.vdi 4G
Formatting ‘vm.vdi’, fmt=vdi size=4294967296 static=off
x

This command will create virtual disk “vm.vdi” with size 4 GBytes, and the size is dynamic (based on file inside the virtual disk).

Run the the virtual machine with 2 GB RAM and hardisk “vm.vdi” and install guest OS from the Ubuntu ISO CD (Ubuntu 10.04 Lucid alternate CD).

$ sudo kvm -m 2000 -localtime -hda vm.vdi -cdrom ubuntu-10.04.3-alternate-i386.iso -boot\ once=d
x

It will open QEMU windows, and Ubuntu welcome screen for guest OS installation.

KVM-Install

x

After change the command line to run guest OS from the virtual disk.

$ sudo kvm -m 2000 -localtime -hda vm.vdi -net \ nic,model=rtl8139,vlan=1,macaddr=00:01:F0:45:00:10 -net \ tap,vlan=1,ifname=vm1.0,script=no
x

That command will run guest OS from the hardisk include virtual interface and MAC address which will be bridge with the host OS for creating the connectivity between the guest and host OS machine.

KVM-running

x

Reference

1. KVM/Installation

2. QEMU/Images